ServiceNow Group Best Practices

Groups in ServiceNow are a container (many lovingly call a bucket) for users that have similar purposes or functions. It’s really easy to go astray with groups, and there isn’t much guidance on how to best use them and govern them (besides some honorable mentions).

Table Structure

Just a quick refresher, a Group is a record/row in the sys_user_group table. This table has a couple notable columns, including:

Manager - Should be MANDATORY, every group should have an active manager that is responsible for keeping the group up to date, in terms of purpose, members, description, etc. They should be responsible for quarterly reviewing the group. Note: Many organizations also add a custom field for manager delegates to specify additional users, or they use the OOB delegates feature in ServiceNow.

Group Email - Should be OPTIONAL and sparingly used, depending on it’s purpose some groups should never should receive any email. Also some areas abuse this field and put a dummy email address and are none the wiser.

Parent - Should NEVER BE USED, most modern day implementations, it is best to not leverage parent groups, especially for the purposes of granting roles, reporting hierarchy (use department/business unit/cost center), or “rollup”. Just hide the field and wipe your hands clean.

Description - Should be MANDATORY, every group should have a clear concise description saying what the group is for, and in a certain repeatable format. Typically it should be several sentences to fully describe the audience, usage and related process area.

Source - Should be OPTIONAL, if you use LDAP integration, this field is populated automatically. Otherwise you may choose to populate it with something, but most people choose to leave it as is otherwise. Blank for manually managed groups, and filled in for LDAP/other source.

Group Type - Should be MANDATORY, every group should have one or more group types that help categorize what process areas/purposes the group is used for. This is arguably one of the most critical fields, so you can properly filter down to relevant groups on different forms.

Notable Mentions: Hourly Rate (may be important to populate for chargeback/routing decision trees), Default Assignee (usually not used in the wild… but maybe in small organizations), Exclude Manager/Include Members (usually left as default), Points field (if you are using gamification on communities)

Best Practice Guidelines

1) Separate Process and Security Groups. As a general rule of thumb you should separate the way you grant a role, and the group you use for Catalog Tasks or Incidents. In small organizations this can make sense temporarily, but as you scale, the management of roles almost always is handled by a separate group and has separate criteria for acceptance (training, department, etc.).

2) Define and govern Group Types. As mentioned above it is critical to define a list of group types and have central control over any changes to the list. The related reference fields that point to group should all have a reference qualifier based on the type, so only the proper groups are selected. Also most of the OOB group types aren’t very good… Here is an example of groups types:

  1. security - used for groups that grant roles

  2. catalog - used for catalog request fulfillment

  3. incident - used for groups that can be assigned and work incidents

  4. problem - used for groups that can be assigned and work problems

  5. change - used for groups that can be assigned and work change requests

  6. vulnerability - used for groups that can be assigned and work vulnerable items

  7. knowledge - used for groups that can be assigned and responsible for knowledge articles

  8. approval - used for groups that are used for the primary purpose of group approvals (like a Platform governance group!)

3) Avoid Duplicate Groups. Minimize any potential for creating multiple groups that grant the same roles, and have the same purpose. Every time a new group is created, the current list should be consulted to make sure nothing else fits the need.

4) Groups should not mimic Department structures. Probably one of the easiest traps people fall under is thinking that groups somehow align to departments. Work doesn’t happen in silos, work is collaborative - therefore groups should be collaborative and cross functional. ServiceNow already has a department table structure for that purpose.

5) Don’t Hardcode groups. Besides the cloning aspect, in general it’s still not a good practice to hard code groups into things like UI actions, ACLs, and yes even flows. For security, you should be coding in Roles, and for routing, you should leverage assignment rules or a reference field on a table. The one rare exception where it may make sense to put in groups is within a User Criteria record, but even then, you still have the option to use roles.

6) Use Management Catalog Item. For handling all group related actions, new groups, adding members, updating fields, retiring, should all be handled through a catalog item with the proper approvals built in. There should be built in steps on the create group to check existing groups, and vet the business case. Then on the retirement request, it is important to check related data elements, like where groups “could” have been hardcoded, and make sure data elements like knowledge articles and incidents are moved under a new group.

7. Have a Group Management Dashboard. This is the cherry on top that brings the process full circle. Set up different reports and metrics to see how your groups are being used and if all the correct fields are being populated. Example: Set up a report for catalog groups, and make a list of how many haven’t been used in 6 months. Another example, set up a report for any groups without an active manager. Have an admin check this dashboard once a week/month and take any corrective actions.

Interested in what other best practices people have for managing ServiceNow groups, feel free to comment below!
Deleting Fast and Safe in ServiceNow

One of my first articles, Deleting Fast in ServiceNow, is my most popular and controversial, and for good reason. This is the last of my series on following up on my most popular articles, at least for now!

In summary of my prior article, I evaluated different delete options in ServiceNow to evaluate which was the fastest to delete records of the APIs available. I found that GlideRecord deleteMultiple running from a workflow had the best execution time overall.

The Controversy

I slammed the GlideRecord deleteRecord method pretty hard, since it was over 1,000 times slower, but I didn’t really unpack the need to sometimes not fire business rules, notifications, and workflows while deleting. The deleteMultiple option does trigger business rules by default, and all the above, however, the method setWorkflow(false) does actually work with deleteMultiple as well!

That being said, it’s typically safer to disable any OnDelete notifications, business rules and then run deleteMultiple. You may also want to consider turning off audit delete as well beforehand, otherwise you’ll have to clean up the audit table records with deleteMultiple again (unless you want the safety net).

The method deleteRecord still has it’s place when you want to delete a single, or less than a handful of records, and in some ways it can be a bit safer since it is slower to delete.

Best Practice

Before doing any mass deleting, I would strongly recommend to read ServiceNow’s KB0717791 on Mass Deletion recommendations. There is also a good resource, called Safety Tips for writing Background Scripts, which covers a lot of the common mistakes people make while doing things like deleting. If you are deleting medium to small datasets, it actually isn’t a bad idea to run it as a background script, since a rollback context is generated, which allows you to restore the data.

Exploring More

As promised I looked into some additional factors that could have a play with deleting. Namely Auditing, big fields with data, and a baseline deletion for reference.

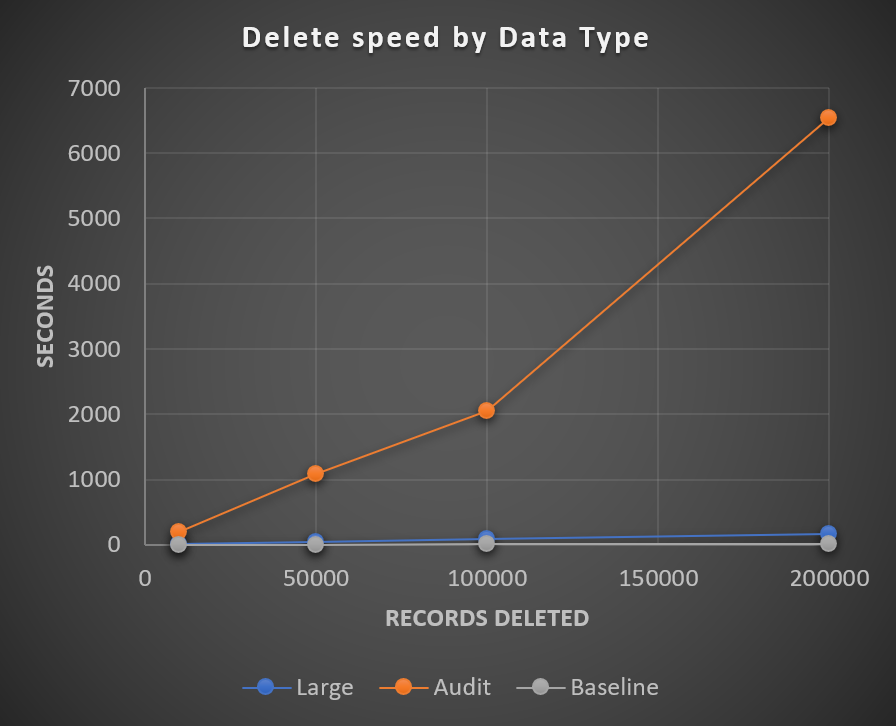
delete speed by data type with data series of large, audit and baseline

A comparison that shows delete speed by different types of records.

Auditing Impact

For testing auditing, I had 3 small string fields similar to the baseline and just enabled table level auditing. Unsuspectingly, turning on auditing on a table drastically reduces the delete operation speed, as it has to check cascade reference rules, back up a copy of the record onto the audit table, etc. It’s almost surprising though how this impact is very linear. The deletion time is increased .03s per record processed. Goes back to show how important it is to minimize auditing unless it is absolutely necessary.

Big Fields Impact

For testing big fields, I added 3 large 4000 character limit string fields, and populated them with random data. The impact is noticeable, taking 150s longer to delete 200k records than the baseline, but overall, the linear rate increase is .0008s per record processed. From my research, this seems to boil down to the buffer pool size, which the data is cached in case of an undo while it is being deleted.

Baseline Comparison

My baseline table only had 3 small string fields, with no auditing. It took <1s to delete 10k records, and less than 10s to delete 200k records - which leaves the base speed for record deletes to happen around 1 record every 0.00005s. Mind blazingly fast! So if you want to reduce delete speed, it has more to do with the data size and options (auditing) than the count.

Advanced Deleting - Time Slice Method

Wanted to throw in a strong mention about how some tables in ServiceNow, namely sys_audit which are notorious for being large and sharded have to be handled special when it comes to deleting (and other DB operations). There is a known technique where you would step day by day, and sometimes hour by hour to delete all the records within that timeframe. This method takes advantage if the data is indexed by time/created on, and sharded/broken up by time. This way you are strategically retrieving and accessing data in sequence, and removing it surgically. I could probably write a full article on the algorithm - feel free to comment if interested!

Parting thoughts

It’s good to be curious, and see how far we can push the needle. I wanted to leave with the fact that there are even more aspects to explore.

  • Indexing - Typically after data is deleted, the indexing data is not automatically re-processed. This sometimes can lead to the index portion being bigger than the actual table.

  • Table growth monitoring is a good practice. There is a self service catalog item in ServiceNow Support site to pull the top 20 or more tables on your instance. This is a good thing to check regularly. There is also a technology ServiceNow might be releasing more widespread in the future called Instance Observer which has some capabilities for table growth monitoring.

  • MariaDB explains the complexities of big deletes on this KB page, https://mariadb.com/kb/en/big-deletes/. While I think this is really good info, a lot of it does boil down to what options and decisions ServiceNow made in terms of their database configuration, to really let you optimize deletes to the max. Some answers we may never know (unless you work for ServiceNow).

Introduction: What is a PDI?

This article is for all those new to ServiceNow, just getting their feet wet into the platform! (And for you experts, I’ll have a section at the bottom for you too!)

You may have heard the acronym, PDI, which stands for Personal Developer Instance. It’s almost kind of like one of those small personal pizzas! These are small instances you can request using a ServiceNow Developer account. These are one of the best tools to use, so you can get hands on, live experience in a ServiceNow instance, without worrying about impacting a company instance.

To get a PDI, it’s pretty straightforward.

  1. Navigate to https://developer.servicenow.com/dev.do and create a new account

  2. Click the button to Request an Instance

  3. Pick the version you want (you may consider the same version your company is using, or the newest available)

  4. Wait for the provisioning to occur (usually is pretty fast under 5min)

  5. Click the “Open Instance” button to be directed to the instance

  6. You’ll be automatically logged in as an admin user to your own personal instance!

See ServiceNow’s PDI Guide to learn more!

Things to be aware of

  • 10 Day Inactivity Period and TOS - To be able to provide these instances, ServiceNow had to restrict their capabilities, so that they could be released when not in use, and could be put in hibernation. There are jobs that check usage like clicks/activity. Tampering with these jobs and keeping your instance alive is against their terms of service.

  • PDIs have limited system resources - These instances are extremely small, single node instances, low CPU, RAM, DB capabilities. Really just don’t expect too much, and they are not intended to be used by multiple users at the same time.

  • PDIs have a unique instance naming scheme - They will also look like “dev12345.service-now.com”. Technically you could wrap a proxy to make it look like a different URL, but the instance URL is unique to PDIs.

  • Don’t expect a high level of support for PDIs, it’s a free offering from ServiceNow, so it’s mostly understood that it’s a “YOU” problem for better or for worse.

  • PDIs don’t have access to the application repository, any apps you want to publish, you will need to save off and publish as an update set.

  • PDI Data centers - You don’t get a PDI based on your location, you just get one. This could also have some impacts on latency. You can always check the datacenter code from the node name under stats.do

PDI Best Practices

  • Backup everything. Use github or export your XMLs after every development session at the end. Just think of it like saving your work. PDIs can be very unreliable, and you could quickly lose your work if you miss the inactivity window, the restore fails, or your instance gets killed by some back luck.

  • Don’t put any company/sensitive data in a PDI. While they should be safe, protect yourself out there!

  • Try out your code in a PDI first - if it goes rogue in a PDI, it is pretty easy to just release the instance if something goes terribly wrong and start over.

Advanced PDIs

If you’ve spent much time in PDIs, you might start to consider how you can automate all the setup steps and get back up and running fast.

Props to Mark Roethof, he has written a series of articles about the scripts and things you can write to automate loading PDI settings.

Here are list of things you could automate on your PDI:

  • Installing Plugins

  • Setting user settings (favorites, timezone, date/time format)

  • Applying your favorite utilities via a batch update set

  • System config like MID server, email config, or more!

I’m so thankful for PDIs, that enable learning, hobby development, and as a proof of concept instance, and more!

MID Server Administration in 2022

My second most popular blog article since founding this blog was “Best Practices: MID Server Administration”, and while I think it has aged well, things are ever changing. I won’t be rehashing everything again, just where I think some updates are needed!

  1. Basics

    a. Sizing / Server Specs

    MID Servers have gotten more resource intensive over recent years, some newer applications (ACC, CPG, EM) are being recommended to add more CPU (now up to 8 core), and more memory (8gb normal, 16 on the high end). I’ve also seen some Discovery Patterns like Kubernetes chug with 4 core CPU and 6 GB dedicated wrapper memory - but it’s very dependent on the scale of discovery. I would recommend a base load out in Production with 8 Core CPU, 12 GB RAM, 60GB Disk, and updating the MID Server config to leverage more than 25 threads, and 6GB or more of usable RAM. You might be able to get away with less for Orchestration, and you’ll need more for specialized cases like ACC.

    b. Multiple Services on a Single Server

    It’s possible to install the MID Server and run it multiple times on the same physical/virtual server. For sub productions this is an amazing way to scale to add additional MID Server services, while maximizing Server resources. I think the practice makes a lot of sense in certain situations, but there are some key limitations. MID Servers can interfere with each other and cause resource spikes, they will compete for network bandwidth directly, and they can make issues harder to debug. I would stick to only using these in subprod, and regardless how beefed up the server is, I wouldn’t go any higher than 3 services running on the same box.

  2. Counts - How Many?

    a. MID Server Calculator / Discovery Estimator

    ServiceNow provides a worksheet to go through and calculate based on how many devices (servers, routers, switches, storage arrays, load balancers) you have, and how often you need the discovery data refreshed. If you have 10k servers, but only need them discovered weekly over the weekend, then you can get away with fewer MID servers. If you need them discovered daily, but can only discover them at night, to reduce system load, then you need a much higher number of MID servers. There are definitely companies out there that have over 100 production MID servers to handle such large amounts of infrastructure and time requirements.

    b. Redundancy

    Besides having enough MID servers to do the job, the next level of maturity is introducing redundancy measures. If most of your MID servers are in a single data center, and that goes down, you need a backup plan. There should be multiple redundant servers in different data centers and for different use cases like orchestration and discovery.

  3. Time Sliced Usage

    To make the most out of your MID server, it is important to think about spreading out the load, both across multiple MID servers, as well as spreading it out along the timeline. Most people are familiar configuring discovery schedules, but it is also important to think about this in the sense for other applications as well, to try and spread out the run times. You could for instance have another service running an integration load during the day, and a separate service on the same server running discoveries at night.

  4. MID Servers in Containers - The Future

    I would be amiss if I didn’t talk about the very obvious future of MID Servers in the ecosystem. More and more applications are moving towards containerized approaches, such as with a Docker image, and I would imagine MID server would move that way as well. A docker image can be set up with a specific operating system and configuration, and can be spun up and down with a click of a button. It would be a more cost effective approach to just use what you need, and it would be easier to quickly scale up and down devices. I hope ServiceNow invests in this technology in the future.

I hope MID Server administration practices become much more mainstream as time progresses!

Best Practices: MID Server Administration

Below are some of my personal thoughts and advice on MID Server configuration, set-up and maintenance. Some of these are pretty well known and adopted, and some are based on my personal experiences.

  1. Basics

    a. Sizing / Server Specs

    Specification wise, RAM/Memory and CPU Core Count/(and associated threads) are the most important. Usually 8GB RAM, 4 Core CPU is recommended with 40+GB disk and 64bit OS which is a requirement being enforced going forward. Within the MID server parameters there are options to use more RAM, Threads, etc. Generally specifying to use more RAM is recommended, and using more threads, results can vary.

    b. Network (Bandwidth and Location)

    This point is the key reason that MID servers are needed in the first place. They are a necessary appliance so that you can securely interact with other resources and devices on a network. It’s important to have fast connection speed (usually 100mb/s upload is recommended), and put the MID server physically close to the devices it is interacting with, for quick and optimized interactions. If you have multiple data centers, the servers should be spread out in those data centers, and put ones on similar subnets as the majority of devices.

  2. Segregate by Purpose

    a. History

    The biggest flaw I’ve always seen with enterprise MID server set ups, is that there is no separation between Discovery and Orchestration usage. Many Discovery credentials are server admin or granted powerful rights to log into machines and run discovery commands. There are a couple ways you can force orchestration tasks to use specific credentials, using credential tags, and hardcoding MID server IP relationships with the target Orchestration device. However you can’t lock down the Discovery credentials to only be used for discovery, which can be a major security issue.

    b. Resolution

    The only guaranteed mechanism for locking down those credentials is to lock them down to only be allowed to use on specific MID servers. Additionally on those MID servers you have the options to not allow Orchestration application. Thus it’s critical to have separate MID servers for Discovery, Orchestration, JDBC and other activities to enforce proper credential usage.

  3. Security

    Review the MID Server Hardening Guide.

    There are a number of overlooked recommendations, for setting specific security parameters, like disabling SSL, TLS 1.0 and 1.1, setting the DH group value and encrypting proxy passwords (if applicable).

  4. Closing Thoughts

    Besides just initial setup, every administrator knows that you have to keep current with upgrades, restarts, and rekeying the credentials. Besides those standard activities to take it a step further, you can set up proactive monitoring, such as using the built in MID Server resource threshold alerts, or advanced tools like PerfMon, Microsoft SCOM or Datadog.

Hope everyone learned something! I’ve been absent, but hopefully we can start off 2021 right and have a lot of content. Please comment your ideas or anything you want to see!